User Tools
This is an old revision of the document!
Table of Contents
Getting started with the Projucer
The JUCE Projucer is a code and IDE-project generator. You specify what kind of project you want (e.g. GUI application, Audio Plug-In, etc.), and the target IDEs you intend to work with (e.g. Visual Studio, XCode), plus some other details such as a project name, and the Projucer will generate a complete project/solution for each IDE, including a few “starter” code files. You can then open each project/solution in the appropriate IDE, click on “Build” and within a few minutes have a working app or plugin for your target platform.
Well, that's the theory. In practice, there are lots of little details to understand, which can be overwhelming when you're just getting started. On this page I'll take you step-by-step through building a synthesizer plugin for Windows (VST v2.4) and Macintosh (AU v2).
Creating your first project with the Projucer
The first thing you'll see, when you run the Projucer for the very first time (after you clear the hurdles), is the “Create New Project” page, shown below. On subsequent runs, you'll most commonly see the last .jucer project you had open, which the Projucer remembers. To create a new project, go to the Projucer's File menu and close whatever project is open, then choose “New Project…”
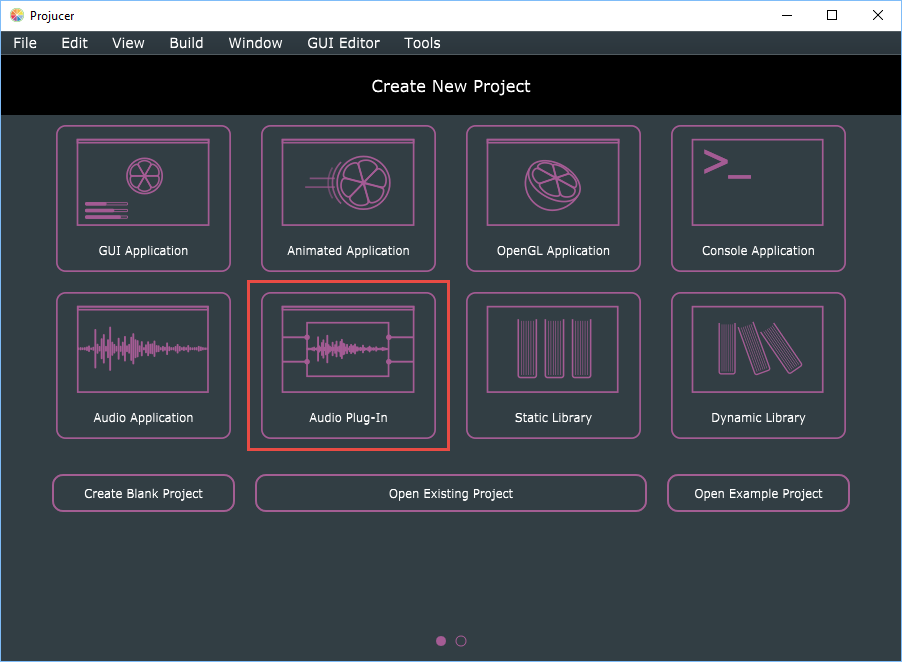
The Create New Project page has eight large graphic buttons for the eight most common project types. Click the button labeled “Audio Plug-In”, which I have outlined in red in the screen shot above. This will take you to the “second half” of the Create New Project page, as shown below. (Note the two pink circles at the bottom of the screen shot; these indicate that the page has two parts, and you can go back and forth between them by clicking on the circles. The filled circle indicates the currently-shown part.)
The first time you try the Projucer, when you haven't a clue what any of this means, it can be a little daunting, but it's actually straightforward.
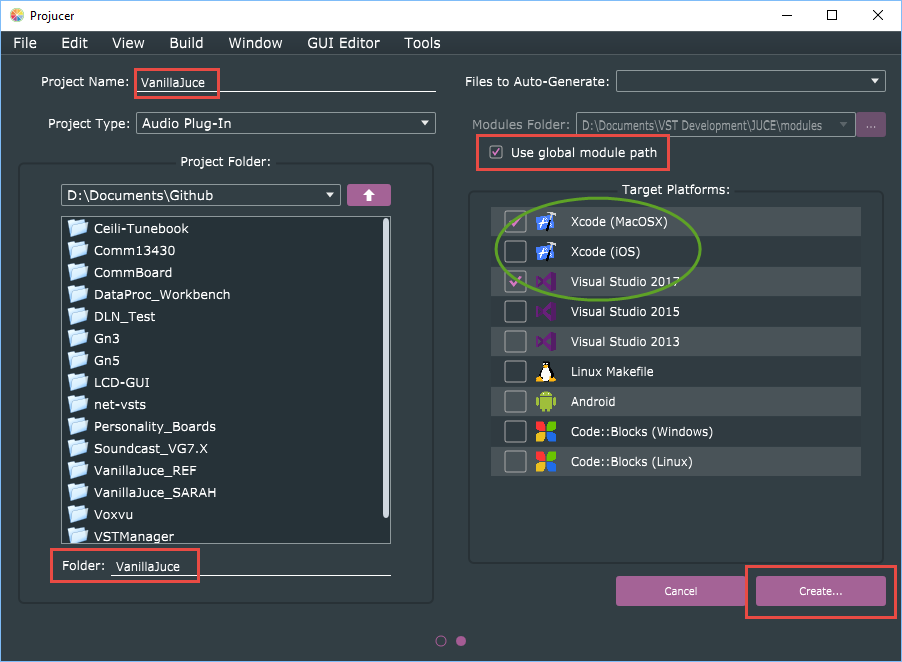
The left half of this page is where you tell the Projucer where to put your new IDE project(s) and what to call it (them).
- Start by using the large folder-navigation box on the left (it works just like an Explorer/Finder window) to choose the folder in which you want your new project's folder to be created.
- The label “Project Folder” is a little confusing; I started by creating a new folder for my new project and selecting that, and ended up with a folder called “VanillaJuce” inside another folder called “VanillaJuce”.
- What you want to see in the combo box just under the label “Project Folder” is actually the path to your “projects folder”. The Projucer will create a new folder for your new project inside this one.
- After selecting your projects folder, go to the “Project Name” field at the top left, and type the name of your new project, in my case “VanillaJuce”.
- Whatever you type will automatically appear in the “Folder” field at the bottom left, i.e., the default name for your new project's folder is the same as the name you choose for your project. If you want a different folder name (but no change to the project name), you can type something different in the “Folder” field.
The right half of this page is where you select what kind(s) of IDE project(s) you require. Well, mostly. There's also that mysterious “Modules Folder” combo box near the top, and the “Use global module path” checkbox below it. These are related to what I said earlier about where you decided to put your main JUCE folder. I recommend that you DO check the “Use global module path” checkbox, and, if you chose to put the JUCE folder somewhere other than C:\ on Windows or your home directory on Mac/Linux, do the following right now:
- Click on the Projucer's File menu and choose “Global Search Paths…” to see this dialog:
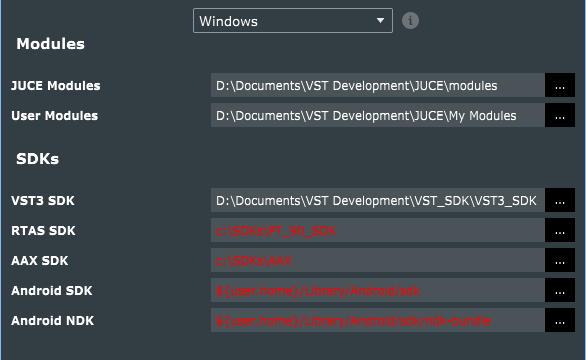
- Fill in the correct path to the
JUCE\modulesfolder, wherever you decided to put it - Put something in for “User Modules” and “VST3 SDK” even if you aren't using these yet.
- Fill in the any of the lower four SDK paths only if you have actually installed them.
- If you will be generating IDE projects for a different computer (e.g., I ran the Projucer on my Windows PC and built both Visual Studio 2017 and XCode projects), use the drop-down menu at the top of the dialog to select your other platform(s) and fill in the appropriate paths for these also, unless you decided to install JUCE etc. in the default locations (which I recommend for Mac/Linux).
- Close the “Global Search Paths” dialog using the little “X” at the top of the window; there's no “OK” button.
Now that you have defined your “global paths”, the “Use global module path” checkbox should make sense, and you should understand why I suggested that you check it. So, back to the Projucer's Create New Project page:
- You can ignore the “Files to Auto-Generate” item at the top right; it isn't used for Audio Plugin projects.
- The “Target Platforms” list is straightforward. Check off whichever platforms you would like to build your plugin for.
- As I said earlier, I strongly recommend that you use Visual Studio 2017 on the Windows platform. The JUCE source code is being modernized at an aggressive pace, with the result that older versions are fast becoming incompatible due to use of newer parts of the C++ language standard.
- On the Mac, XCode is used to create plugins for Mac OS or iOS, but you need to specify which one(s) you want. If you check both, the Projucer will create two separate XCode projects (in separate folders) which point to the same group of source-code files.
- Note there is no option to select finer details at this time, e.g., whether or not you want to generate both plugin and stand-alone targets in your IDE projects. Don't worry; you'll be able to do this later.
- At this point, click the big pink “Create…” button at the bottom left, and the Projucer will immediately generate your first set of IDE projects.
A quick tour of the Projucer's output
The Projucer will create a new folder for your new project, containing three subfolders and a .jucer file:
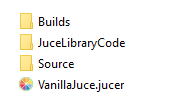
The .jucer file is the Projucer project file, containing all the details you specified above. If you double-click this icon you'll re-open the project.
The Source folder contains the source code files that are unique to this project. For an Audio Plugin project, there will initially be four files as follows:
PluginProcessor.handPluginProcessor.cppdefine a new subclass of the JUCE AudioProcessor class, which represents your plugin itself.PluginEditor.handPluginEditor.cppdefine a new subclass of AudioProcessorEditor, which represents your plugin's GUI.
I'm not going to go into any detail about the content of these files. You can learn plenty by working through some of the JUCE tutorials. My goal here is to tell you what the tutorials don't mention, which you otherwise have to find out by trial and error.
The JuceLibraryCode folder's purpose is explained very nicely in a little ReadMe.txt file in it:
Important Note!!
================
The purpose of this folder is to contain files that are auto-generated by the Projucer,
and ALL files in this folder will be mercilessly DELETED and completely re-written whenever
the Projucer saves your project.
Therefore, it's a bad idea to make any manual changes to the files in here, or to
put any of your own files in here if you don't want to lose them. (Of course you may choose
to add the folder's contents to your version-control system so that you can re-merge your own
modifications after the Projucer has saved its changes).
So, these files are not the entirety of the “Juce Library Code”; the rest is in the JUCE Modules folder we went to such trouble about. These files are simply the few that have to be customized for your specific project.
The Builds folder is the most interesting one at this point. Here is what my VanillaJuce\Builds folder contained, after I selected Xcode (MacOSX), Xcode (iOS), and Visual Studio 2017 as my Target Platforms in the Projucer:

The Projucer created two separate folders for the two XCode targets (Mac and iOS), and one for Visual Studio. These folders can simply be copied as-is over to a Mac, and the XCode project files they contain opened and compiled—provided you set your Mac global search paths correctly, and installed put the JUCE modules folder and (optionally) VST3 SDK folder in the corresponding locations (see here for details. If not, you can always open the Projucer project again, modify the settings, and re-save to re-generate all IDE project files.
The contents of the VisualStudio2017 folder look like this:
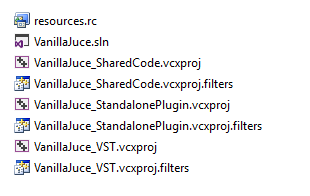
There is a single .rc file (binary resources), one .sln (solution) file, and three pairs of .vcproj/.vcproj.filters files for three individual Visual Studio projects:
- one to build the VST plugin (
VanillaJuce_VST) - one to build the stand-alone application (
VanillaJuce_StandalonePlugin) - one to build a
.libfile from all the code which is common to both plugin and standalone versions
Of these, the “shared code” file is by far the largest. It contains references to all of the code files in the Source and JuceLibraryCode folders, as well as a ton of files in the “JUCE modules” folder (which is why the Projucer needed to know where to find it). The others two projects just contain a couple of wrapper code files.
Reopening the project in the Projucer and re-generating the output
The Projucer's initial output is based on default settings for Audio Plugin projects. Once you have hit the “Create…” button, the Projucer window will change to something like this:
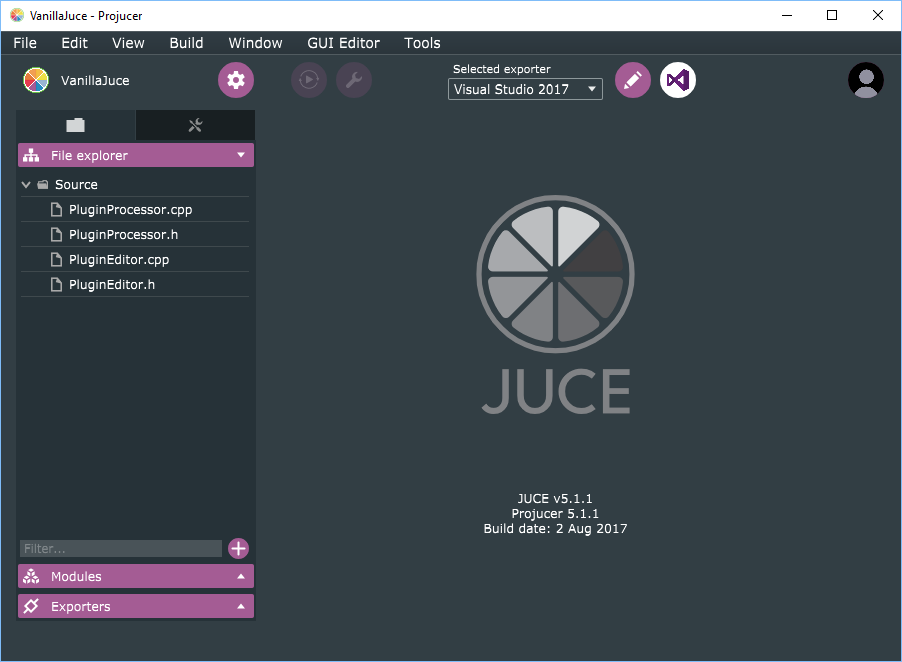
If you decided to close the Projucer, you can simply run it again to get to the same point. The Projucer will normally re-open to whatever project you had open the last time you closed it. If you happened to close the project, then close and re-open the Projucer, You'll see an almost empty window, and you can then get to the same point by going to the File menu to re-open your project's .jucer file.
You have several options when you have (re-)opened an already-created Projucer project like this:
- After making any changes, you can go to the File menu and choose “Save Project” to re-save the
.jucerfile and re-generate all the IDE project files.- This is pretty much the whole point of using the Projucer at this stage.
- Bear in mind that all the IDE project files (everything in the
BuildsandJuceLibraryCodefolders) will be overwritten. I'll tell you how to handle that in a moment.
- As mentioned above, if you got any of your global paths wrong, you can choose “Global Search Paths…” from the File menu and make appropriate changes.
- You can change the project settings by clicking on the
 button, which opens a view like this:
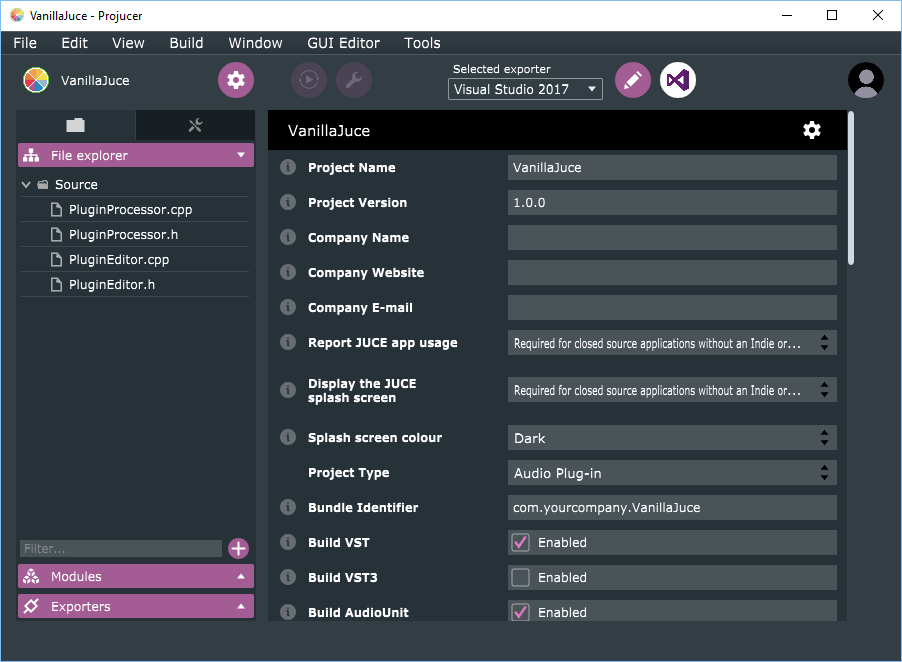
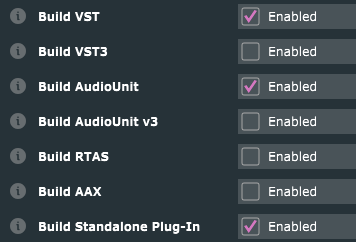
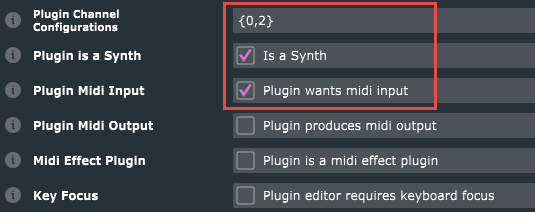
The large scrolling list of project settings has lots of items that you can ignore until you're ready to fill them in, e.g. Company Name and Website, but there are a few that you will need to set for a synthesizer plugin: